

I’m writing this sitting on the floor of my student room at university in France. I thought I would be spending lockdown alone but all my flatmates decided to invade Lyon; there isn’t too much space, but we get on alright. We watch films together, do yoga every evening and, most importantly, inspect our basket of fruit and vegetables that we collect each week. We signed up to a scheme called AMAP (the French love their acronyms) which roughly stands for the Association for Supporting Small-Scale Farming, a nation-wide distribution system that ensures a fair price for both parties and fresh, in-season vegetables for us. Now every Tuesday we wait to see what mud-covered, gnarly, sometimes-past-their-prime veggies have been harvested from fields nearby.
When our basket first arrives, there are moans and groans. “Why have we got 30 radishes? What on earth is that?”. Then comes a little meal plan; chard risotto Friday evening, fennel gratin Saturday lunch, squash soup and bread Saturday evening… Those knobbly, dirty seasonal vegetables are transformed into something delicious.
We normally think of winter as a barren season, however it is anything but. Go on the hunt for seasonal vegetables and you’ll be amazed at the variety. Okay, potatoes are a-plenty, but keep an eye out post-halloween for sweet-fleshed pumpkins, all kinds of leafy green veg, beautiful purple beetroots and the unassuming fennel, cabbage and cauliflower.
As the clocks turn back, the culinary holy trinity – onion, carrot and celery – should all be easy to find. Why are they sacred? Because with them you can form a base, a soffritto, for a myriad of soups, stews, and sauces. The basic ratio is 2 onions : 1 carrot : 1 stick of celery. Chop into a fine dice and sauté on a low heat in olive oil for around ten minutes. Then go from there. Take inspiration from my October article and make a minestrone. Or how about a chilli con or sin carne for a weekend dinner with your flatmates? And if you’re feeling lazy, add to scrambled eggs for an outrageously tasty breakfast.
Pumpkins often have a rather sad fate after halloween. The UK bins about 8 million pumpkins after halloween each year. However these winter squashes are perfect for pieces, warming bowls of soup and festive veggie loaves. Check out the first wonderful winter recipe:
Squash, Mushroom, Spinach and Onion Pie
This recipe is quite involved but no stage is difficult. To cut down on time, make sure you start to defrost your spinach earlier in the day, and consider roasting the butternut squash at the same time as you cook your rice and fry your onion and mushroom.
Pastry preparation
- 1 batch failsafe pastry (check out my galette article for the recipe – you can make this in advance, freeze, and defrost in the fridge before using!)
- 1 egg (save for construction stage)
Roll your pastry into a rectangle a bit bigger than an A3 sheet of paper. Transfer to a baking sheet lined with a piece of baking parchment and place in the fridge for at least two hours.
For the butternut layer
- 1 butternut squash, peeled and cubed
- Olive oil
- Salt
- Pepper
Roast the butternut squash cubes in the oven drizzled with oil and seasoned at 180C until soft, around half an hour, turning as necessary after twenty minutes. Leave to cool.
For the rice layer
- 100g rice (I used Camargue red rice for its nuttiness and chewiness but basmati, brown, long-grain would all work equally well)
- Cumin seeds
- Bay leaf
- Olive oil
- Cloves
- 2 onions
- 250g mushrooms
Cook the rice according to packet instructions, adding a sprinkle of cumin seeds, five cloves, a bay leaf and a drizzle of olive oil to the cooking water. I strongly recommend to follow the instructions for a light, dry rice – we don’t want stodgy student rice here. I know it’s good, but it just won’t work! When cooked, remove the bay leaf and cloves.
Chop your onions into thin slices. Add to a pan with a drizzle of olive oil on a low heat and cook for around eight minutes. Meanwhile chop your mushrooms into thin slices. Add the mushrooms to the onion and cook until soft.
Mix everything together and leave to cool.
For the spinach layer
- 300g frozen spinach
- 50g pine nuts
Leave to thaw in a sieve. When thawed, wring out in your hands. Wring out again. You want to get out as much water as possible. Toast your pine nuts in a pan.
Assembly
Start with the rice layer – spread an even layer of the mixture on the middle of the pastry in a rectangle about 45cm x 12cm. Then on goes a layer of spinach, pine nuts scattered over. After that pile your butternut squash chunks on top. Don’t overdo it! Wrap one side of the pastry rectangle over the filling, then the other. Make sure they overlap with an inch of pastry – use a knife to cut any excess. Carefully turn over so that the ‘seam’ is underneath. Tuck the top and the bottom underneath, pinching to seal. Use the extra pastry for decorations; mushrooms, leaves, holly branches, whatever takes your fancy. Score the pastry with diagonal lines and place your decorations on top. Crack egg into a bowl and whisk. Cover the entire pie with this egg glaze. Then into a preheated oven at 170C for 20 minutes or until the pastry is gloriously golden and crispy. Present on a wooden chopping board and listen to the crackle as you cut through the pastry casing to reveal three gorgeously colourful layers.

And now for something a little more lowkey! The winter vegetable with the worst reputation has to be the Brussel sprout. When I was little, I hated them. Each Christmas I would beg that no more than two be put on my plate. Now I’m older, know better, and am less sensitive to the bitter compounds that make them so widely hated. And all the better, since Brussel sprouts are high fibre, contain more potassium than a banana, and (so long as there aren’t shortages…) should be great on a student budget. Still not convinced? Next time you make a stir fry, shred a few and chuck them in. At worse, you won’t even notice them. At best, you’ll be able to navigate the Christmas table much better.
Then come the winter vegetables that leave you perplexed; fennel, cabbage and cauliflower. Fennel tastes too strong, cauliflower, too weak, and cabbage is just a bit, well, gassy. You could make a cauliflower cheese, a coleslaw, or a cheesy fennel gratin, but adding cheese feels like cheating and anyway, isn’t the aim to be able to taste these winter veggies rather than drowning them in dairy in the hope that no-one will notice what they’re actually eating? So, to put these baffling oddballs in the spotlight, I really recommend a good roasting. It’s shockingly simple. For fennel, chop in half, then cut inch-thick wedges and put carefully into a roasting tray. Likewise for cabbage. For cauliflower, separate the head into florets. Then cover in olive oil. A couple of cloves of garlic or some sliced onion would make a nice addition. A drizzle of balsamic vinegar for extra sweetness. Thinly sliced lemon works a treat too. If you’re feeling like it, add some spices, such as cumin, ginger, or turmeric. Use your hands to make sure your veggies are evenly covered with mixture. Then pop into the oven at 180C for around three quarters of an hour, turning every ten minutes, adding more oil if needed, until melty, oily, and slightly blackened at the edges. These can then be stored in the fridge in Tupperware for up to five days, and make a brilliantly quick and simple lunch paired with pitta, hummus, falafel.
For a winter spin on hummus, look no further than the beet greens family, to which Swiss chard and beetroot both belong. If you don’t make your own hummus and you have a blender, start now! It is infinitely better than the shop-bought stuff which is bulked up with a disgraceful volume of water. Take a jar of cooked chickpeas (save the chickpea water), three tablespoons of tahini, a couple of cloves of garlic, crushed, and the juice of a lemon and blitz together. To make a brilliantly fluffy, silky hummus, add a good amount of the chickpea water back in. Taste as you go and add more garlic or lemon as necessary. (Sometimes I get up to five cloves, depending on the strength of the garlic and whether I’m in a particularly garlicky mood!) In winter, add a couple of medium-sized cooked beetroots to your hummus for a stunning colour.
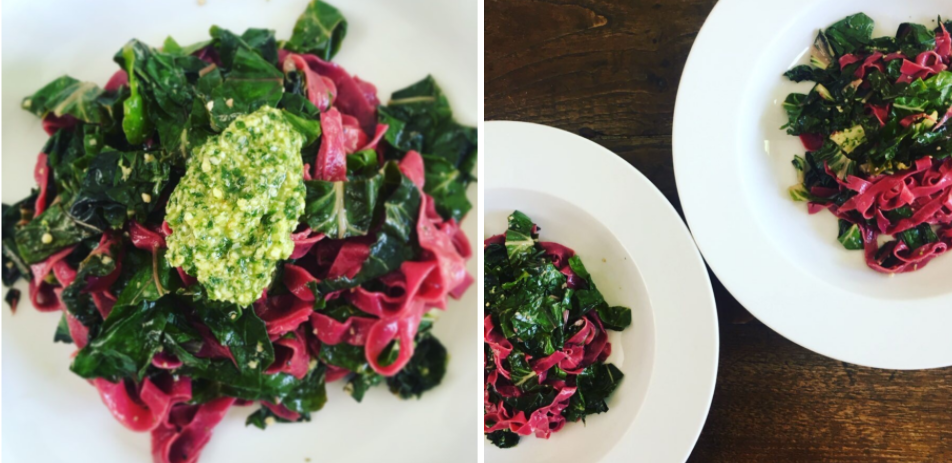
However, what about Swiss chard? Last but by no means least, is my recipe for purple pasta with sautéed chard.
Purple pasta with sautéed chard
Makes 2 servings.
Ingredients:
- 200g 00 flour (normal flour does work too, but 00 flour shouldn’t be too difficult to seek out and is more authentic) plus extra for rolling
- 2 eggs
- 1 bunch of Swiss chard
- 2 small cooked beetroot
Method:
Mush the cooked beetroot with the back of a fork or blitz, until you have a fine purée. Then make the pasta dough. This is not as complicated as you might think, though if you are a beginner you might want to make a batch or two without the beetroot and then move on to this recipe when you’ve got the hang of how a pasta dough works. To make it easier to clear up, put your flour into a large mixing bowl and add the eggs and beetroot purée to a well in the middle. Use a fork to draw the flour in and start kneading as soon as you can. Knead for around eight minutes, adding a little flour when necessary, until you have a smooth dough. Cover in plastic wrap and put in the fridge to rest for half an hour.
At this point, get a large saucepan of water up to the boil and add a big pinch of salt. Cut your chard into inch long pieces and sauté in a large frying pan (larger than you think you need, you’re going to add the pasta to this pan), adding the tougher stems first, then the leaves at the end of cooking. While this is cooking, make your pasta ribbons. Take a quarter of the dough at a time, keeping the rest underneath the plastic wrap, use a rolling pin to roll out your dough on a lightly floured surface as thinly and evenly as possible. Cut into ribbons and leave on a floured baking tray while you roll and cut the rest. Add to the boiling pasta water, making sure that it doesn’t stick at the beginning. Fresh homemade pasta cooks in no time at all. Sometimes just a minute does it, depending on how thin your noodles are, so keep tasting every 20 seconds or so if you don’t feel confident. Add a good glug of oil to the Swiss chard pan and when your pasta is cooked, transfer directly into this pan, not worrying too much if you don’t manage to drain all the water. Toss and serve as it is, or with a big dollop of pesto on top (head over to @greens_and_grains for two scrumptious pesto recipes).
And that brings this whirlwind tour of winter veg to a close. Surprising, delicious and certainly not boring.
Photos: Isobel Sanders